How to Resize EBS Volumes with Linux EC2 Instances in AWS

How to Resize EBS Volumes with Linux EC2 Instances

We have an EC2 instance perhaps a small application that doesn’t require many resources. But we there is requirement to increase disk space.

https://lh6.googleusercontent.com/pBU7nPe4hF_mu8R-hlRRprGJSWt77FuCUk3nRcPSEj3XSCcaTfGG2FhY6hTh-kbR0Igty6sjMRoan2OGj5C_RoOCClR5q2rDa-7tU4o5WKLy3AflcXr0SbarQinzZ7JvHkKUtkhv

Since this application uses little storage, a small, 20GB general purpose AWS EBS volume has been attached.

https://lh5.googleusercontent.com/deGcwd8NzuAzUlmFdoCIk4DPcp_0DmnfsxdZIuh4GbT1nk2WSYzabl7ePxNxzRArOjCwWxZ6sv9ZLu9ZS0ve7iMBc2X1_eE6L7tYaUAtVwoYGQJfXM6ypavtIgseG4D62lRq3Nti

First, go to your volume and choose “Modify Volume” under “Actions.”

https://lh3.googleusercontent.com/J1gUmGVdsy6MskI8hQQj5Yar4Rpdh6927Dmn_kzdx4qpI0NkUPOKgr9K_Z6O35a0-x2amxExRPXSCkXr_EL2z0B_MjonycYgAQwDZqgwKHOQoQ2rZsT-lnvTWT4N_yQjIBqNbd23

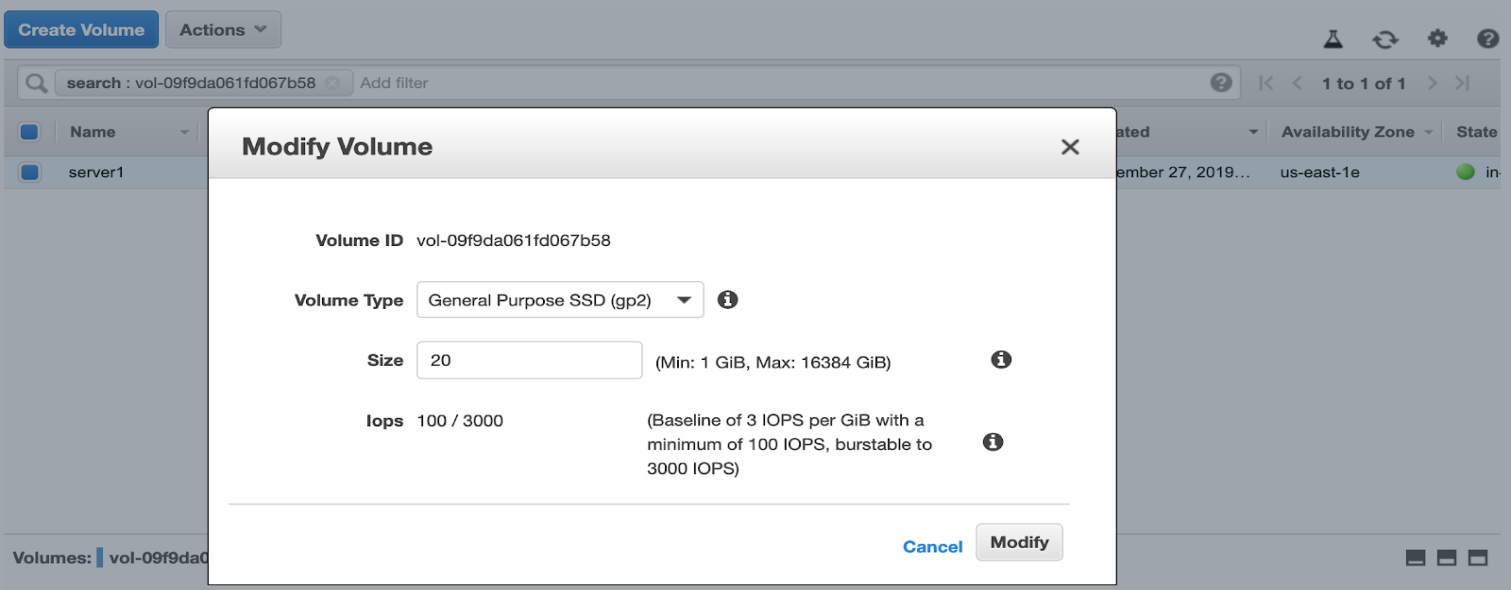
You are then given the option to change both the disk size and the volume type.
https://lh4.googleusercontent.com/tUT555i5824gJcomgchUo2x5TK4RhnuXtJi7GnLgcaXStLM5yJVecm-lethfbLtZrRejKEAPJnH7LrpH7-L5MwjIPw4FUnUVap24butfsVzCO6IKmxTq3JcDzB9x8UF5zN9lRV9G

You can also switch to Provisioned IOPS SSD (io1), increase the size to 100GB, and have the IOPS set to 5000 if your requirements necessitate this step.
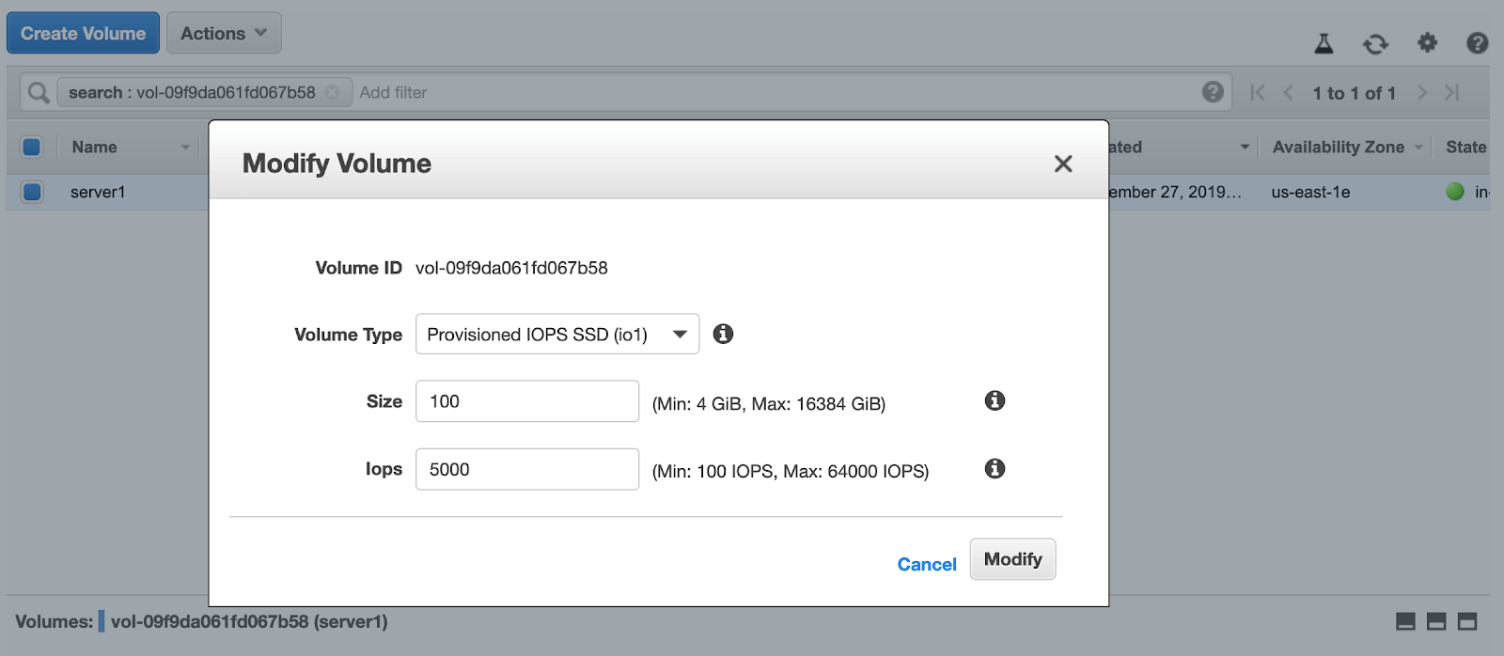
https://lh4.googleusercontent.com/YCHjj-ZaqnA5ku_k54ItJAsS5H5BeusY1yitM9XFYIZFBF1gB-n-14tsqQMqNRAvy2vqT_NIH3EXDDMUQBHjaMWibbVS-DGIG1t08gi44Rxy2P7_ShkLwnWDKhircqx7wxKjqdnJ

Remember that if you are resizing your root volume, you won’t be offered the option to change to Throughput Optimized HDD (st1) or Cold HDD (sc1).

Starting the EBS resizing process

In this example, we’ll extend the volume to 30GB and retain the volume type. To do this, adjust the values and start the resizing process by clicking on “Modify.” The volume will now begin the optimization process, which you can follow on the console.

https://lh3.googleusercontent.com/nGyXVt2DZHXAekBS9jrxu7Rt7fQp5Xiljjuoq3s0fJDrgnCgRZvLxHAr3Dmaxe2ctPxrgonG3INndyRBLIAUwcEI1MdQfNeYOVLFKmpRsfSkymjKVcJy0BVHHwJnuSbsreIRC4co

The time it takes to optimize the volume depends on the volume’s size. In this case, the process took 5-10 minutes. After it was over, the volume state color turned green again, showing that the resizing was finalized.

https://lh4.googleusercontent.com/euAO96bHoOOpsvwV8Xlsaj2HdEPUfDXb3hh8NvzEqMur_833LLgPYUgsFuQU-TwOxZzJA99WqrBIxE7foH_4wvMDUiDiH4OCrVNamZJMBI37oFPfR3EaOc7vBiNw4uIQk7BgFokB

After the volume has been extended, the EC2 instance and the system both need to be adjusted to adapt to the new size. Note that you can do this adjustment either as a root or a user with sudo privileges.

The first step in this process is checking the partition size.

https://lh4.googleusercontent.com/9CouxOOaWu7r_UOOHwoJfLX6nQUXVYI9wFNrmix0eKOui9wqUffDn4HRADUkptkzsW2aDUfv6Pqtg4oXmfFxCFrNaaGWMnJ0Whsn3VArLu-msVasXuvtjiVUlVAGcKe9gLSh3USt

The screenshot above shows that the volume has been extended; however, the primary partition is still at the volume’s original size. To expand the partition, use the command shown in the screenshot below. After you do so, you will see that the partition has grown to match the volume size.

https://lh3.googleusercontent.com/t8Z6XEFbqKPOU7J6Jg5IfRyjPG1JdNiqM5J5y3tW9cHeHKN3YKnjtsjrZmJed1p5IVjIfmHLtE6mK5yQVqK71twy6HyDv-lX-0lWsZ0LhSuN9b45xc4-HqlF5y0N-gxJRCA43uuS

Note that there is a space between “/dev/xvda” and “1.” “1” refers to the partition number.

Checking the file system size

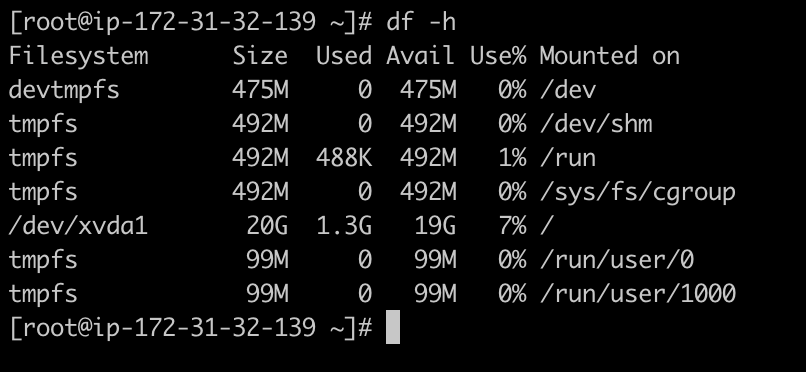
Next, the file system size needs to be checked. In the screenshot below, you will notice that it is still only registering 20GB, even though both the volume and partition have been resized.

https://lh6.googleusercontent.com/i84eTi4KN8jfx_1jPG5izKmpo0a9-xXh2JywWniVcWaSu0Bp7gscubjT-fpimrpWqtE4wjnqFDLPAmtmAR_e7clgjsdCM1cJDVRGaw8Tx6TvuTDVSwGI2f0rkfgF96hQ2l94pLUV

If you were using an ext4 (or even older ext2 or ext3) file system, you could extend it using the “resize2fs /dev/xvda1” command.

In our case, since the file system is XFS, we have to rely on the “xfs_growfs” tool, which should already be in the system. If not, you can install it yourself as part of the “xfsprogs” package.

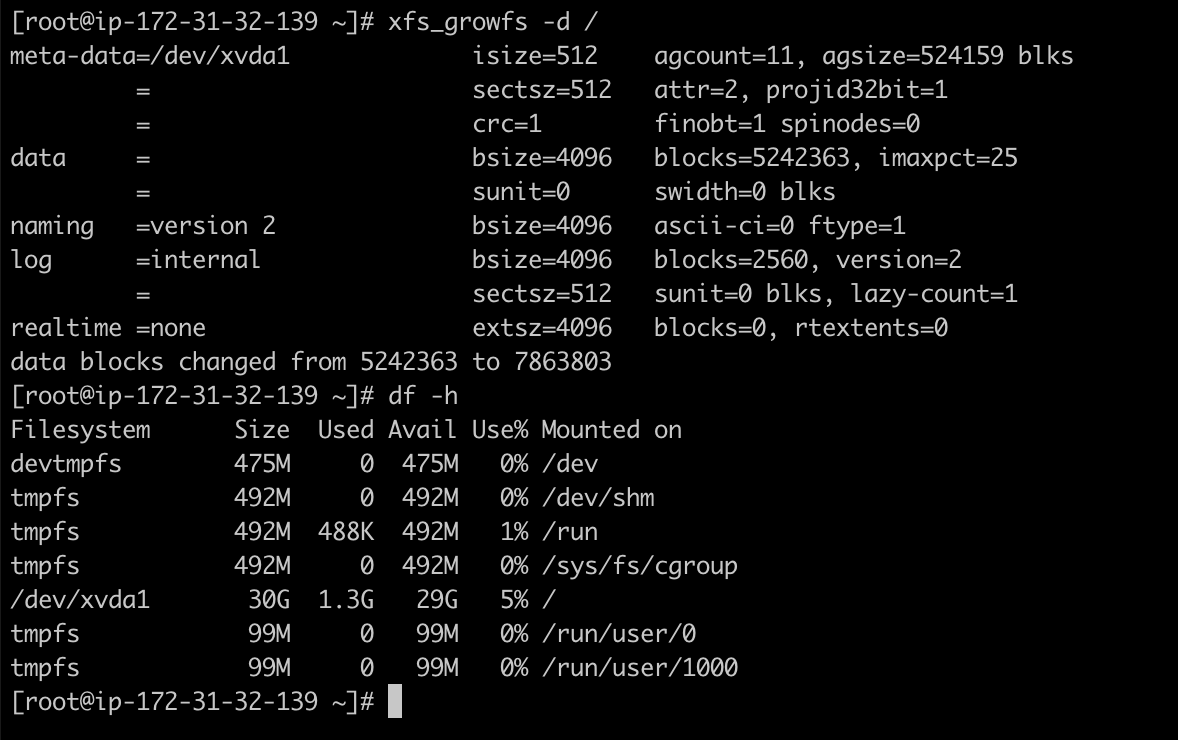
Using this, we can proceed to extend the file system to match the volume and the partition size of 30GB. We will target the “/”, since that is where “/dev/xvda1” has been mounted.

https://lh5.googleusercontent.com/vLGktjQQcnF2yrmqhvXEg8_QD7sb2dGjRMU6VapymSTbha9DB1UNBW6Yl7C1Y-zaEEzzJ5R6vPFJrCl_ZYgHOtjic8NttJKrQgMfIBn3UktRW9GVBLckfqB2xiDCQcFkSnuwRsBO

The volume is now fully resized and ready to be used. No downtime resulted from this process.


AmritMatti

I’m the owner of “DevOpsTechy.online” and been in the industry for almost 5 years. What I’ve noticed particularly about the industry is that it reacts slowly to the rapidly changing world of technology. I’ve done my best to introduce new technology into the community with the hopes that more technology can be utilized to serve our customers. I’m going to educate and at times demonstrate that technology can help businesses innovate and thrive. Throwing in a little bit of fun and entertainment couldn’t hurt right?

View all posts by AmritMatti →

Leave a Reply

Your email address will not be published. Required fields are marked *